
Быстрый старт: камера OV5647 на 5 Мп с моторизованной фокусировкой
Камеры
| Артикул | Разъём (контакты, сторона) | Сенсор | Разрешение | Особенности | Объектив | Угол обзора (Г × В) | Фокусировка | Чувствительность к ИК |
|---|---|---|---|---|---|---|---|---|
| B0176 | 15, снизу | OV5647 | 5 Мп | Миниатюрная | Штатный | 54° × 44° | Автофокус | ИК-фильтр 650 нм |
| B0176R | 15, снизу | OV5647 | 5 Мп | Для 3D-принтера | Штатный | 54° × 44° | Автофокус | ИК-фильтр 650 нм |
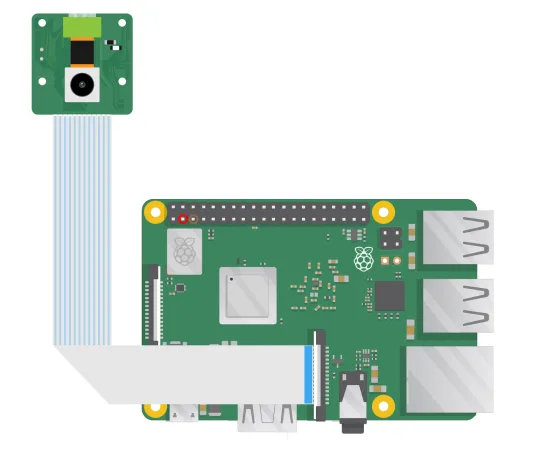
Аппаратная часть
ПО
Включение драйвера фокусировки
Выполните команду sudo nano /boot/config.txt и добавьте в раздел [all] файла конфигурации строки ниже — они настраивают камеру и драйвер мотора.
Bookworm и Pi 5
Для Raspberry Pi OS Bookworm на Pi 5 выполните:
sudo nano /boot/firmware/config.txt
#Find the line: camera_auto_detect=1, update it to:
camera_auto_detect=0
#Find the line: [all], add the following item under it:
dtoverlay=ov5647,vcm
#Save and reboot.
Чтобы включить камеру на порту cam0 Pi 5, внесите такие изменения:
sudo nano /boot/firmware/config.txt
#Find the line: camera_auto_detect=1, update it to:
camera_auto_detect=0
#Find the line: [all], add the following item under it:
dtoverlay=ov5647,vcm,cam0
#Save and reboot.
Bookworm/Bullseye и Pi 4
Для Raspberry Pi OS Bookworm/Bullseye на Pi 4 выполните:
Bookworm на Pi 4
sudo nano /boot/firmware/config.txt
#Find the line: camera_auto_detect=1, update it to:
camera_auto_detect=0
#Find the line: [all], add the following item under it:
dtoverlay=ov5647,vcm
#Save and reboot.
Bullseye на Pi 4
sudo nano /boot/config.txt
#Find the line: camera_auto_detect=1, update it to:
camera_auto_detect=0
#Find the line: [all], add the following item under it:
dtoverlay=ov5647,vcm
#Save and reboot.
Bookworm/Bullseye и Pi 0–Pi 3
Для Raspberry Pi OS Bookworm/Bullseye на Pi 0–Pi 3 выполните:
Bookworm на Pi 0–Pi 3
sudo nano /boot/firmware/config.txt
#Find the line: camera_auto_detect=1, update it to:
camera_auto_detect=0
#Find the line: [all], add the following item under it:
dtoverlay=ov5647,vcm
#Save and reboot.
Bullseye на Pi 0–Pi 3
sudo nano /boot/config.txt
#Find the line: camera_auto_detect=1, update it to:
camera_auto_detect=0
#Find the line: [all], add the following item under it:
dtoverlay=ov5647,vcm
#Save and reboot.- Откройте терминал.
- Выполните
sudo raspi-config. - Перейдите в Advanced Options.
- Включите графическое ускорение Glamor.
- Перезагрузите Raspberry Pi.
Если возникнут проблемы с выводом изображения на экран, выполните также следующие шаги:
- Откройте терминал.
- Выполните
sudo raspi-config. - Перейдите в Advanced Options.
- Перейдите в GL Driver.
- Выберите GL (Full KMS).
- Перезагрузите Raspberry Pi.
Затем перезагрузите Raspberry Pi, чтобы изменения вступили в силу.
sudo rebootУстановка libcamera от Arducam
Шаг 1. Скачайте bash-скрипт:
wget -O install_pivariety_pkgs.sh https://github.com/ArduCAM/Arducam-Pivariety-V4L2-Driver/releases/download/install_script/install_pivariety_pkgs.shchmod +x install_pivariety_pkgs.shШаг 2. Установите libcamera:
./install_pivariety_pkgs.sh -p libcamera_devШаг 3. Установите libcamera-apps:
./install_pivariety_pkgs.sh -p libcamera_appsУправление фокусом на Pi 0–Pi 4
rpicam-still -t 0 --tuning-file /usr/share/libcamera/ipa/rpi/vc4/ov5647_af.jsonНепрерывный автофокус
rpicam-still -t 0 --autofocus-mode continuous --tuning-file /usr/share/libcamera/ipa/rpi/vc4/ov5647_af.jsonОднократный автофокус
rpicam-still -t 0 --autofocus-mode auto --tuning-file /usr/share/libcamera/ipa/rpi/vc4/ov5647_af.jsonРучная фокусировка
rpicam-still -t 0 --autofocus-mode manual --tuning-file /usr/share/libcamera/ipa/rpi/vc4/ov5647_af.json
# Use keyboard to control focus
# "f" trigger one-shot autofocus
# "a" add the lens position, "d" decrease the lens position, the minimum unit of step adjustment is 1
rpicam-still -t 0 --autofocus-mode manual -k --tuning-file /usr/share/libcamera/ipa/rpi/vc4/ov5647_af.json
Положение объектива
rpicam-still -t 0 --autofocus-mode manual --lens-position 5 --tuning-file /usr/share/libcamera/ipa/rpi/vc4/ov5647_af.jsonАвтофокус перед съёмкой
rpicam-still -t 0 --autofocus-on-capture --tuning-file /usr/share/libcamera/ipa/rpi/vc4/ov5647_af.jsonДиапазон фокусировки
# Normal
rpicam-still -t 0 --autofocus-range normal --tuning-file /usr/share/libcamera/ipa/rpi/vc4/ov5647_af.json
# Close Focus
rpicam-still -t 0 --autofocus-range macro --tuning-file /usr/share/libcamera/ipa/rpi/vc4/ov5647_af.json
Управление фокусом на Pi 5
rpicam-still -t 0 --tuning-file /usr/share/libcamera/ipa/rpi/pisp/ov5647_af.jsonНепрерывный автофокус
rpicam-still -t 0 --autofocus-mode continuous --tuning-file /usr/share/libcamera/ipa/rpi/pisp/ov5647_af.jsonОднократный автофокус
rpicam-still -t 0 --autofocus-mode auto --tuning-file /usr/share/libcamera/ipa/rpi/pisp/ov5647_af.jsonРучная фокусировка
rpicam-still -t 0 --autofocus-mode manual --tuning-file /usr/share/libcamera/ipa/rpi/pisp/ov5647_af.json
# Use keyboard to control focus
# "f" trigger one-shot autofocus
# "a" add the lens position, "d" decrease the lens position, the minimum unit of step adjustment is 1
rpicam-still -t 0 --autofocus-mode manual -k --tuning-file /usr/share/libcamera/ipa/rpi/pisp/ov5647_af.json
Положение объектива
rpicam-still -t 0 --autofocus-mode manual --lens-position 5 --tuning-file /usr/share/libcamera/ipa/rpi/pisp/ov5647_af.jsonАвтофокус перед съёмкой
rpicam-still -t 0 --autofocus-on-capture --tuning-file /usr/share/libcamera/ipa/rpi/pisp/ov5647_af.jsonДиапазон фокусировки
# Normal
rpicam-still -t 0 --autofocus-range normal --tuning-file /usr/share/libcamera/ipa/rpi/pisp/ov5647_af.json
# Close Focus
rpicam-still -t 0 --autofocus-range macro --tuning-file /usr/share/libcamera/ipa/rpi/pisp/ov5647_af.json