OpenCV: захват кадров с камеры V4L2 на Raspberry Pi (Python)
Какие модули камер Arducam подходят
Руководство подходит для модулей камер Arducam для Raspberry Pi, которые работают с драйвером V4L2.
OV9281 для Raspberry Pi
- Модуль камеры Arducam Camarray OV9281
- Плата стереокамеры Arducam Camarray OV9281 (2 × 1 Мп)
- Комплект стереокамеры Arducam Camarray OV9281 (2 × 1 Мп) с платой Camarray HAT
- Комплект из четырёх камер Arducam Camarray OV9281 (4 × 1 Мп) с платой Camarray HAT
OV2311 для Raspberry Pi
- Модуль камеры Arducam Camarray OV2311
- Плата стереокамеры Arducam Camarray OV2311 (2 × 2 Мп)
AR1335 для Raspberry Pi
- Камера MIPI Arducam 13MP OBISP для Raspberry Pi
AR0230 для Raspberry Pi
- Камера MIPI Arducam 2MP HDR OBISP для Raspberry Pi
Подготовка
Убедитесь, что драйвер V4L2 и утилиты установлены, а камера работает.
sudo apt install v4l-utilssudo apt-get install libv4l-dev && sudo pip install v4l2captureВыполните команду, чтобы получить список доступных форматов изображения:
v4l2-ctl --device /dev/video0 --list-formats-extВ выводе будут форматы, которые поддерживает источник видео.
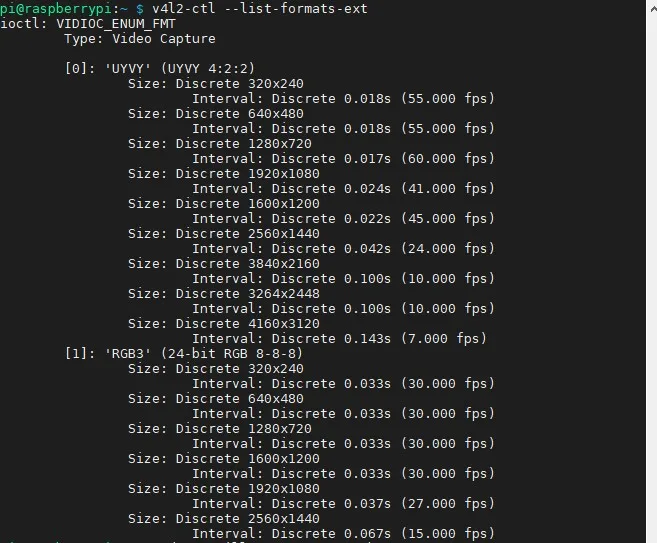
Ширина и высота изображения понадобятся в скрипте ниже. Например, чтобы снимать кадры с AR1335 в полном разрешении, укажите ширину 4160 и высоту 3120.
Пример
Пример показывает, как захватывать изображения с одного модуля камеры OV9281 через OpenCV. Если у вас другой модуль камеры, измените код под свою камеру. При правке сохраняйте отступы.
Строки 23–24:
На предыдущем шаге вы получили видеорежимы, которые поддерживает модуль камеры. Подставьте нужные значения:
image_width = $YOUR_TARGET_WIDTH_FROM_LIST_FORMAT
image_height = $YOUR_TARGET_HEIGHT_FROM_LIST_FORMAT
Строка 27:
text = "$WHATEVER_YOU_LIKEСтрока 57:
Если камере назначен не узел video0, укажите нужный видеоузел:
video = v4l2capture.Video_device("/dev/video0")Строка 74:
cv2.imshow("$WHATEVER_YOU_LIKE",image_data)Строки 28–29, 76 и 80:
По умолчанию в примере клавиша «t» сохраняет снимок, а «q» завершает работу. Если нужны другие клавиши, измените эти параметры.
#!/usr/bin/python
#
# python-v4l2capture
#
# This file is an example of how to capture a picture with
# python-v4l2capture.
#
# 2009, 2010 Fredrik Portstrom
#
# I, the copyright holder of this file, hereby release it into the
# public domain. This applies worldwide. In case this is not legally
# possible: I grant anyone the right to use this work for any
# purpose, without any conditions, unless such conditions are
# required by law.

import Image #pip install http://effbot.org/downloads/Imaging-1.1.6.tar.gz
import select
import v4l2capture #sudo apt-get install libv4l-dev && sudo pip install v4l2capture
import cv2
import numpy as np
import time
i = 0
image_width = 1280
image_height = 800

def print_message():
    text = "This demo is used for Arducam ov9281 camera\r\n\
    press 't' to save image\r\n\
    press 'q' to exit demo\r\n"
    print(text)
def align_down(size, align):
    return (size & ~((align)-1))
def align_up(size, align):
    return align_down(size + align - 1, align)
'''
convert to real 10 bit
'''
def remove_padding(data, width, height, bit_width):
    buff = np.frombuffer(data, np.uint8)
    real_width = int(width / 8 * bit_width)
    align_width = align_up(real_width, 32)
    align_height = align_up(height, 16)
    buff = buff.reshape(align_height, align_width)
    buff = buff[:height, :real_width]
    buff = buff.reshape(height, real_width)
 #   print(buff)
    buff = buff.astype(np.uint16) << 2
    # now convert to real 10 bit camera signal
    for byte in range(4):
        buff[:, byte::5] |= ((buff[:, 4::5] >> ((4 - byte) * 2)) & 0b11)
    # delete the unused pix
    buff = np.delete(buff, np.s_[4::5], 1)
    return buff
if __name__ == "__main__":
    print_message()
    # Open the video device.
    video = v4l2capture.Video_device("/dev/video0")
    # Create a buffer to store image data in. This must be done before
    # calling 'start' if v4l2capture is compiled with libv4l2. Otherwise
    # raises IOError.
    video.create_buffers(3)
    # Send the buffer to the device. Some devices require this to be done
    # before calling 'start'.
    video.queue_all_buffers()
    # Start the device. This lights the LED if it's a camera that has one.
    video.start()
    select.select((video,), (), ())# Wait for the device to fill the buffer.
    while True:
        image_data = video.read_and_queue()
        image_data = remove_padding(image_data,image_width,image_height,10)
        image_data = cv2.cvtColor(image_data,46)
        image_data = image_data>>2
        image_data = image_data.astype(np.uint8)
        cv2.imshow("Arudcam OV9281 Preview",image_data)
        key= cv2.waitKey(delay=5)
        if key == ord('t'):
            cv2.imwrite(str(image_width)+"x"+str(image_height)+"_"+str(i)+'.jpg',image_data)
            i+=1
            print("Save image OK.")
        if key == ord('q') or key == 27:
            break
    cv2.destroyAllWindows()
    video.close()